Showing posts with label board game. Show all posts

Monday, 3 September 2012

Ticket to Ride Europe

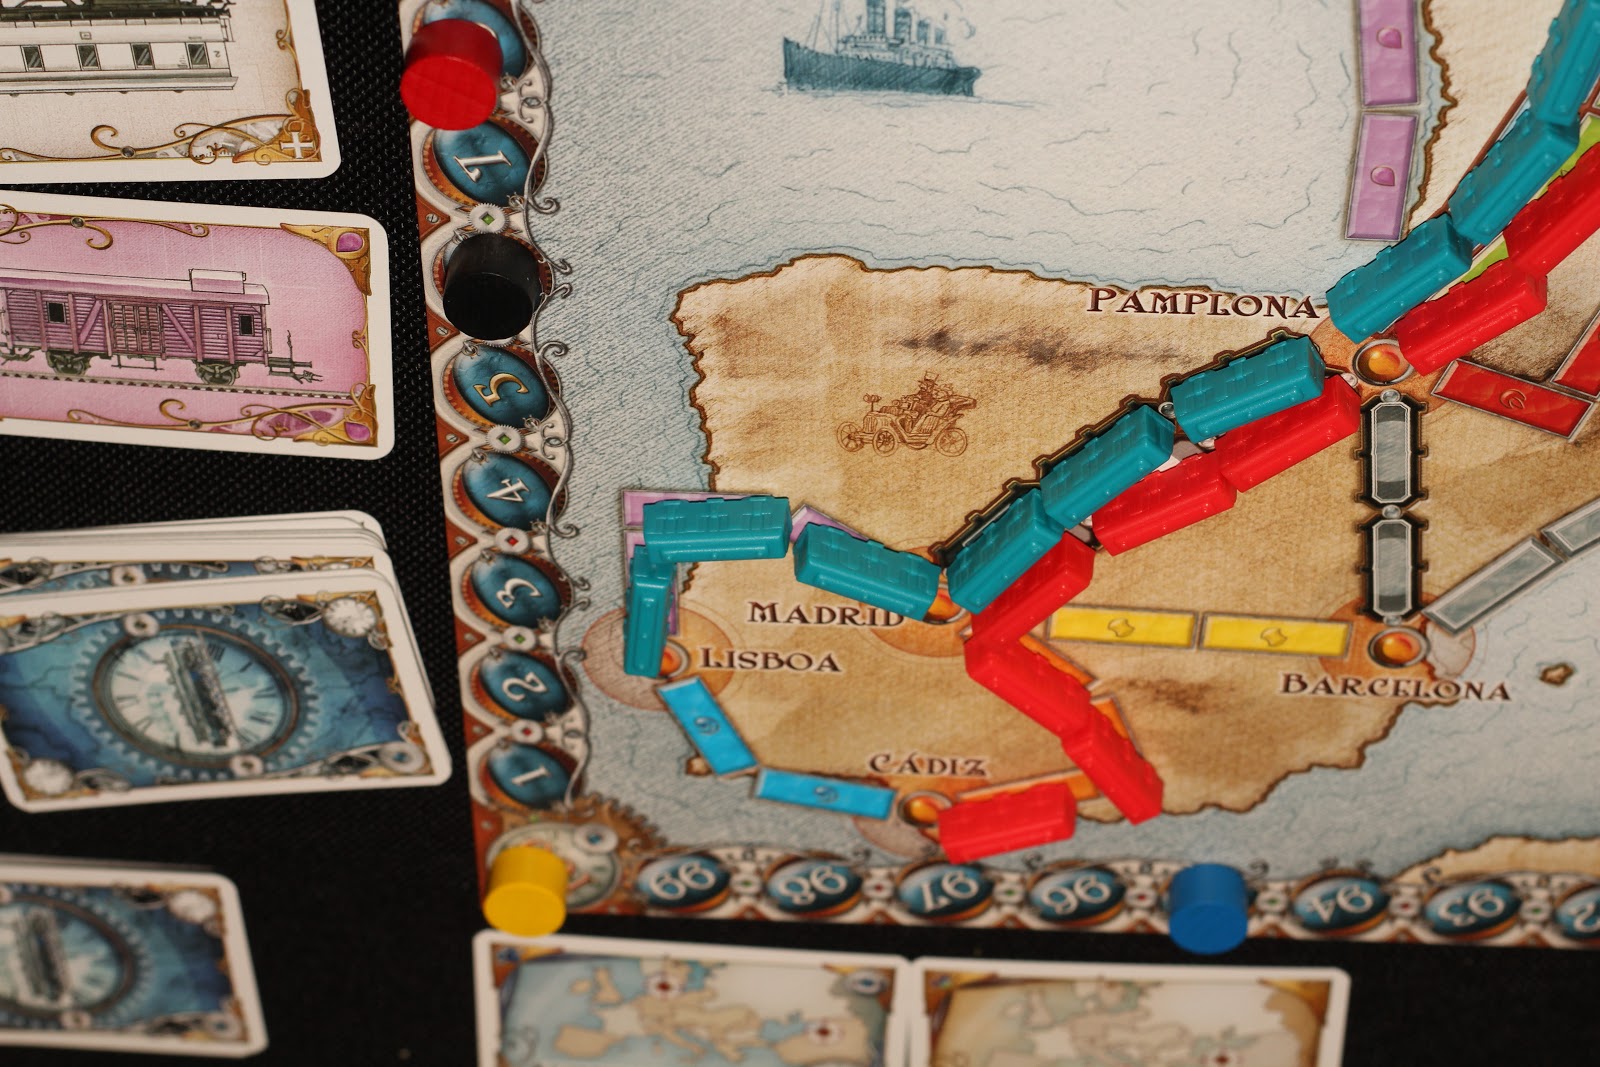
One of my friends brought Ticket to Ride : Europe to our board game night. He was the only one who had played before, with the other three players (myself included) being complete novices. Rules were explained in a few minutes, with a few special cases (tunnels & ferries) taking up about half of that time. The game concept is immediately obvious from just glancing at the board and although there are some considerations about how the colours, tickets etc interact we could dive right in.


The game was fast-paced, slowing down only when players drew new tickets and needed a few minutes to figure out which of the three cards to retain (at least one, but up to three can be kept). Ongoing scoring was quick and there was competition for longest track by all players except myself throughout the game. I dropped out as soon Amsterdam-Essen was developed by another player as I judged it a lost cause at that point.

The game ends one turn after a player hits 2 or less remaining trains and this turned out to add a lot of tension in the last few rounds. Whenever one of my competitors drew cards instead of placing trains it was a huge relief as I was working on one last ticket. In the end I didn't make it as the game ended while I was still missing the Moskva-Smolensk connection to complete the Rostow-Smolensk ticket.


Final scoring for tickets easily doubles player scores, with huge swings for incomplete tickets. We had one player with an incomplete 21-point ticket, giving him a massive penalty without which he would have undoubtedly won the game. This means that while players can have a points lead throughout the game the winner is never obvious and tension remains high. Finals scores were 108-106-100-95 so it was a fairly tight distribution.


Overall this is an enjoyable and approachable game that I'd recommend for casual gamers. We'll almost certainly play it again and it will be interesting to see if the game holds up to repeat play.

Friday, 3 August 2012

Stronghold invader phase overview

Continuing my first impressions post on the Stronghold board game, this part covers the phases 2 through 6 of the turn sequence.


Phase two of each turn when the invader builds machines. In the basic games this includes covers which protect a rampart against marksman fire, something my opponent used to good effect. It also included ballista and catapult engines, with the former being used to kill defenders on the walls and the latter destroying wall sections.

Ballista seemed moderately effective, inflicting a casualty every other turn. Gradual attrition could lead to an eventual breach, but there is also an area-denial aspect as the presence of a ballista discourages placing a veteran on a wall section (due to the high cost of training them and the certainty that it will be targeted). I can see the threat of Goblin Frenzy combined with two ballista covering a single wall section being a real nightmare but thankfully my opponent used his Goblins for rituals instead after some early frustration with goblin traps.

Catapults have the same hit rate as ballista but with a new stone wall becoming available to the defender each turn this seemed less effective. Good results were achieved (much to my dismay!) when the Bloodstone ritual was used as this killed off a defending unit as well as destroy a stone wall. My opponent noted in the post-game talk that he felt that spreading the machines out was a mistake and that it would have been better to have two engines covering the same section.

Catapult deck with Bloodstone ritual marker and accurate shot tile, a deadly combination!
Phase three covers equipment such as banners, shields and bridges. As each is available in limited quantities it is important to have a clear strategy in mind when placing them. They will signal your intent so you can expect the defender to reinforce the wall sections you threaten with banners, thus possibly drawing in new victims for ballista fire or weakening other sections sufficiently to allow a breach.

Banners and bridges are very easy to understand. Shields are a little bit more confusing because they force the assault on a wall section to be calculated twice if the first assault generates a defender advantage. In the second calculation the shield value is added and casualties are only inflicted on the invader if the defender still has an advantage.

Unlike banners, the shield bonus is per unit so three orcs with banners and shields would attack with strength 7 (2+2+2+1; six for the orcs and one for the banners) and if the defender had 6 or higher strength then invader strength would be recalculated to 10 (2+2+2+1+1+1+1; six for the orcs, one for the banners and three for the shields) for calculating losses. This makes a huge difference and can really help invaders get a foothold on a wall section, letting them survive until the next turn when more units can be moved up.


Training is done in phase four, offering (in the basic game) artilleryman, master archer or saboteur. These are more valuable the earlier they are used and likely to be a focus in the first few turns. As Master Archer is placed on a rampart it is important to make sure there is a bridge guarding the path to that rampart first. Otherwise the defender can place a goblin trap, rendering the Master Archer useless.
A saboteur is in place at the cathedral, increasing action cost by 1 hourglass. One hourglass has been spent on marksmen blessing, normally it would require just one more to complete but will now require an extra hourglass. Sharpshooter in the tower has already been used this turn and is marked as unavailable.

It should also be noted that the Master Archer can be countered by moving marksmen away from any threatened wall section as Goblins can only shoot marksmen (other defenders hide behind walls). While forcing such a withdrawal may be useful, the defender can use Sharpshooter in the Tower or Marksmen Blessing to continue inflicting casualties on any rampart if he's willing to pay hourglasses. My opponent found it very annoying that I just moved marksmen away from threatened sections, replacing them with soldiers who would hide behind the walls.


Saboteurs seemed very important, increasing the cost of many actions by 50% and forcing me to waste several units sweeping them out. I lost more units to tracking saboteurs than to ballista fire! As they can be swept in any phase but only placed in phase four, there is an incentive to sweep them as soon as the third saboteur is placed. This can create interesting tension where the invader may not want to place a third saboteur at all.

Phase five is an opportunity for the invader to carry out fell rituals by sacrificing goblins. These rituals include the aforementioned Bloodstone which turns  a catapult into a deadly threat, but also spectres that turn defender casualties into undead warriors for the invaders and gale that adds extra hourglass costs to movement.


Gale probably has the clearest cost/benefit ratio. If the invader can use it to prevent enough reinforcements being moved to a critical wall section it could secure a win and in more marginal situations it could cost the defender enough hourglasses to at least grant a foothold and maybe some defender losses. While the extra cost was unwelcome I never found the gale to be very effective against me.
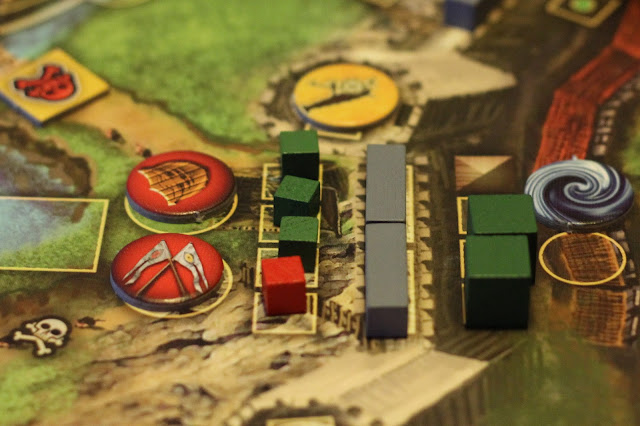
Three orcs and a troll, using banners and shields, attack a wall section guarded by two soldiers. Two stone walls protect the soldiers. A gale is making it difficult for reinforcements to join the fight. The defender's cannon can not target units that are already on the walls.

Spectres are a bit more unpredictable and were never used effectively in our first game as there was not enough defender casualties in the melee phase. They are perhaps best in the mid to late game when several wall sections are under pressure. Hopefully they'll see more use as we gain experience with the game.


Bloodstones were used to very good effect in our first game. While dependent on drawing a hit card for the selected engine the odds can be improved by using artilleryman training and accurate tiles. It was very frustrating for me when my first veteran stepped up on a wall section only to get a catapult bloodstone in the face, earning him an instant one-way trip to Valhalla.

Dispatch and orders are handled in phase 6 and covers the movement of troops and any special instructions. The mechanics are straightforward, with the phase card offering a major and minor dispatch. Each can be used once per turn and offers different number of units that are moved and different hourglass costs. A unit can only be moved once per order, but if both major and minor dispatch are used then a unit could be moved twice.

My opponent noted that after flipping the phase 1 card (which increases reinforcements from 14 to 16 per turn and prevents trading a unit for extra resources) in the mid-game it became difficult for him to move all units forward and his camp rapidly became congested, offering extra hour glasses to the defender.

After the defender spends the hourglasses from phase 6, the game moves on to the assault phase. This will be covered in the next post.

Thursday, 2 August 2012

Stronghold first impressions

Stronghold is a board game covering a desperate battle between an invading host of orcs, goblins and trolls on one side and the human defenders of a castle on the other side. The eventual outcome is not really in doubt as the defenders can not get any reinforcements, but there is glory to be found in a quick victory for the attackers or a drawn-out defence for the humans.

Defender forces in starting positions. White squares are marksmen, green are soldiers. There are no veterans at the start. The red and green circular markers are the officer and warrior, two special defender units.
 The game can be played with 2-4 people, for our first game it was myself as the defender and my good friend Roberts as the attacker. Unlike a game like chess, the board, pieces and possible actions in Stronghold are asymmetrical. Defenders have the protection of high walls and strong gates, with various specialised buildings for assisting the defence. They use hourglasses generated by attacker activity to complete those actions.

The attacker has an off-board supply (where new units are drawn every turn), a camp (where units go if they are not used for something), two foregrounds where they arrive for battle and several ramparts where they move to attack the walls. The foregrounds, ramparts and walls on each side of the board are connected together but units cannot cross from one side of the board to the other.

Stronghold comes with two 20-page rulebooks, two boards, over 240 unit cubes, various tiles and more than 100 cards. This can be quite daunting even to veteran gamers, however the rules do a good job in illustrating what each piece is for and how it all fits together. There is also a basic game variant which uses only a subset of the possible invader actions, meaning that it is not necessary to immediately master all aspects of the game.

One weakness to be aware of is that the turn order overview on page 2 fails to mention an important point: the defender gets two hourglasses and one stone wall section each turn. This is only mentioned on page 7 under hourglasses and actions. It would have been useful to have a printed reminder on the phase 1 card for this as it is easy to overlook in the rules or to forget during game play. At a guess, people who report that the invader has it too easy has probably missed this rule.

Having navigated the rules and figured out which pieces go where, the next step for us was to remove the stuff that isn't needed for a 2-player basic game. This included the haste tile, all trebuchet and siege tower markers, the battering ram components, many tiles for rituals, training and equipment and a lot of phase cards. Doing this really cut down on the confusion level and I'd recommend everybody to do this as step one.

A variety of markers used in the basic game: the defender has placed a pole and a cannon (both yellow) and the green circular marker is an orc cauldron. The red shield, banners and bridge are invader equipment. The swirly marker is a gale ritual and there is a cover protecting the rampart (top right). Two trolls are on the wall section and about to fight two soldiers and the Warrior special unit.
One note here - the phase cards of the basic game identifies the actions available to the invader, however the summary on the back of the invader rulebook fails to highlight those same actions. It would have been helpful to have a star marking the basic game actions in the same was as they cards are marked.

The camp cards are also insufficiently distinct and caused a minor amount of confusion initially. A clear '2 player' or '4 player' mark would have been appreciated although it wasn't hard to figure out which card was right for us.

Setting up the game was very easy. The board is helpfully marked with colour-coded dots that indicate where each unit goes. A minor inconsistency is that there are no equivalent marks on the glory board for the 10 glory initially given to the invader.

Play then proceeded with the invader drawing phase one units and resources, after which nothing happened for a long time. This is one of the quirks of the game as the player is confronted with limited resources which are to be used over the next five phases and even a seemingly simple choice such as 'do you want sacrifice a unit to get additional resources' leads to immediate analysis paralysis for an inexperienced player.

If you are the defender, you may want to go get drinks and snacks. Experience will no doubt reduce the amount of delay here, but at least as far as the first game was concerned 'fast paced' would not be an accurate description. This is unfortunate because a large part of the defender tactics are reactive, meaning that you can't really do much planning of your own.

Once this hurdle had been cleared, each phase proceeded with reasonable speed. Actions used up resources and units for the invader while generating hourglasses for the defender. The latter were then used up by the defender in various ways to counter the threats posed by the invader. As the defender must use all hourglasses after each phase, there is a constant back-and-forth exchange of activity. This compares favourably with games that had massively long turns for each player.

Defender has placed two cauldrons, a wooden wall, a troll trap and a cannon as well as moved a veteran and a soldier to the courtyard, ready to reinforce any wall section. One stone wall has been destroyed (lower left)
 There is no fog of war so all pieces are always known, with the only uncertainties arising from drawing hit or miss cards for siege machines and from the unit draw at the start of each turn. Tension therefore mostly arises from the creation of multiple threats and the limited resources available to counter them. The stakes are high as a single breach will win the game for the invader, leaving no margin for mistakes.

For a breakdown of each phase, see the next post in the series.

Saturday, 2 June 2012

Glasgow wargame show 2012


I grabbed my camera and headed to the Royal Concert Hall this morning for my first ever visit to the Glasgow wargame show. The event started at 10am and I arrived shortly after opening, paid £3 for an all-day ticket and entered to find that the hall was already busy with many games going on and a lot of visitors checking out the traders and games.

Prussian army facing off against Russian and Austrian opponents
Bandit down! RAF scores a kill against the Luftwaffe.
There was a healthy mix of games, some appeared to be demonstration only but others invited active participation. The arrangers were very helpful and welcoming, with many taking time to explain the scenarios and games being played to interested bystanders.
Indian braves advancing in skirmish line
A rifleman seems to be checking his weapon - perhaps after a misfire?

Several of the tables were massive, showcasing warfare across the centuries (11th to 20th) and the continents (Europe, Middle East and North America). While the majority were focused on historical conflict there were two at least two games with fantasy elements.

British troops in line formation prepare to face assault by Indian braves
Fatimid cavalry advancing in the desert
Land, sea and air warfare were all represented and there was also a good range of complexity, with the smallest games having 10-20 units on the table while the largest had hundreds of miniatures.

Crossbowmen at the ready in front of the main Crusader line
It was good to see that the event had a healthy turn-out with visitors of all ages and it looked like people were enjoying themselves. While tabletop gaming may not offer the special effects of modern console games it is considerably more cerebral and I hope the hobby will continue to see new recruits joining, which events like the wargame show will surely contribute towards.
Skirmish at a chapel in a fantasy game
A Crusader army faces their Fatimid foes in open terrain near Ascalon in 1099


Creative Commons License
Pictures are licensed under a Creative Commons Attribution-ShareAlike 3.0 Unported License. A full set of pictures from the day are on Flickr.

Tuesday, 15 May 2012

Retro board game - Fortress America

Published by Milton Bradley in 1986 using a design by Michael Gray, Fortress America is a kitschy thematic wargame that covers the invasion of the U.S.A by socialist armies from Asia, South America and Europe. Only the northern map edge remains safely neutral as Canada refrains from entering the general US-bashing.


All invaders have identical order of battle but choose reinforcement order after turn 1


While outnumbered and attacked from nearly every direction the U.S. forces have the advantage of partisans and other reinforcements through event cards as well as solar-powered lasers that gradually come into play. The invaders hold the initial advantage and must advance quickly to defeat the U.S.A. before lasers can weaken their forces.

However, if the U.S. is defeated then individual victory goes to the invader that has captured the most cities (10 victory points), lasers (5 VP) and resource territories (3 VP). This can lead to rivalry and open warfare between invaders.

It had been at least 15 years since I played the game and I remembered it as being fairly good fun for 4 players, with the U.S. player relying on a strategy of trading space for time while trying to get the invaders to fight each other.

The invaders must grab cities to defeat the U.S. and also want to take out lasers as quickly as possibly (they are built in cities only), with resource territories a distant tertiary objective. They must also consider supply lines and the risk of partisans appearing as well as the possibility of another invader striking at them.

U.S. forces are spread thin as the invasion begins - no partisans or lasers are in play
Recently I had the opportunity to play it again, although only with 3 players (necessitating that one player take on the role of both Asian and European invader). The game turned out to last very long, turning into an unusual protracted battle with huge swings in the number of controlled cities. The invaders regularly pushed the U.S. into loss territory, but could not hold against counter attacks and the game only ends if the U.S. holds less than 13 cities at the end of their turn.

After it finally ended with a victory for the invaders we talked about the high points of the game, the mistakes, the strategy and so on. A couple of points that stood out:

  • The use of dice from D6 through D10 but keeping the target number to destroy an enemy unit constant (always 5 or 6 depending on terrain) is really efficient for quick combat resolution. It avoids addition and subtraction, consisting instead of a fast sort that all players can do easily.
  • The combination of combined arms to overcome terrain penalties and the targeting system makes for interesting battles with calculated risk taking.
  • The supply rules rarely seem to come into play, partially due to map scale and layout and partially because of the balance of forces. However, when out of supply does occur it can change the board immensely.
  • It is unclear if the deck of cards can be reshuffled and used again. We played it as 'when you run out, you get no more reinforcements'. This puts a constraint on U.S. forces (60 + the card effects) similar to the invader limit (60 each). In a long game this means a battle of attrition can be won by the invaders if they can destroy lasers quickly enough.
  • The rules are written quite verbosely, but are clear and don't seem to suffer from any obvious exploits or other issues.
Few U.S. cities remain but partisans fight back and threaten invader supply lines

One thing that all players agreed on was that it was actually excellent fun and if the game hadn't taken so long I expect we might have had a re-match immediately. I've re-rated the game an 8 out of 10 on Boardgamegeek after this play, previously I had it down as a more average 6 out of 10.

I think the game is getting a re-release sometime in 2012. It might well be worth checking it out, do not mistake it for a R.I.S.K. type game - this is good fun with quick game play and does not devolve into 'biggest stack' type strategy.

U.S. forces are reduced to mostly isolated bands of partisans

Tuesday, 24 April 2012

Small World Underground

The original Small World is a fast-playing strategy game for up to 5 players who take turns commanding quirky races conquering provinces on a map which quickly becomes crowded.

The mechanics ensure that each race reaches the limit of their ability to expand in about three turns, encouraging players to place the race into decline and move on to another race. This results in waves of expansion which are more dynamic than a typical 'province control' game where players gradually accumulate ever larger stacks of counters (such as RISK).

The Underground sequel introduces a number of new game elements, adding a certain amount of complexity and uncertainty to the gameplay.

Relics are powerful magical items that provide new powers. The relics move to wherever they are used and therefore usually end up on the frontlines where they are exposed to counterattack and seizure by other players. For example a magical rug (shown in image below) allows your force to fly anywhere on the map, giving you the option of a surprise attack behind the front lines but then leaves the rug in that spot.

Places are stationary sources of additional income or abilities, such as a deep mine providing extra income or a keep providing defences and income (shown in picture below). They often become the focus for savage battles between the races as successive waves of invaders try to seize them for advantage.


While it could be argued that relics and places are too central to winning and therefore detract from what was a more balanced, free-for-all approach in the original game I would counter that there is a valid winning strategy in avoiding relics and places altogether. Maintaining a low profile and staying out of bloody wars can boost income as much or more than holding a mine for a short time.

Similar to the original Small World game, each race is randomly matched with a power. As these combinations vary each time you play the game will remain fresh for longer, throwing up new twists that change how each race plays and adds a degree of strategic choice about when to activate a specific race. Some powers encourage cannibalisation of your declined race while others may provide income when other players attack you. They may also give specific advantages linked to terrain, not having neighbours of another race and so on. This provides a strong influence on tactics.

The map has a dark colour theme, well suited to the underground realms it seeks to depict. A major feature is the river which divides the map, providing either an obstacle to expansion or a highway for rapid conquest depending on which race you control.


The game ships with multiple maps, each adapted to suit a certain number of players. This is a very welcome addition that should be adopted by other game makers.

Because of the way the river splits the board it could cause the game to split into two separate battlefields, however if the aquatic Kraken and Lizardmen come into play or if the rug or pipes are in play then this counteracts this tendency. Any race with the Quarrelling attribute may also find the river useful as a way of quickly expanding into pockets of occupation to maximise their income.

Counters are of good quality with distinctive graphics, using colours, icons and illustrations to allow easy identification. They are also sufficiently thick to make it easy to pick them up. Reverse side is used for when the race is in decline.


Game play is fast, with the situation on the board changing rapidly with each player turn. The objective is to accumulate victory coins which are rewarded primarily from province control exerted both by the active race and the race in decline for each player at the end of his or her turn. Coins are kept face down, making it difficult to track the exact position of each player and victory thus remains uncertain until the very last turn and counting of coins.

The game ends when the turn marker has reached the last position (nine turns for a 5-player game) so typically each player will control three races, two of which will have been put into decline.

Overall this is an excellent game for a small group and I would definitely recommend checking it out.


Creative Commons License
These photographs are licensed under a Creative Commons Attribution-ShareAlike 3.0 Unported License.